http://www.youtube.com/watch?v=ovnqy2qyGYQ
This is a pretty famous technique for photographers that many are applying to their post processing needs. It is a pretty useful technique to focus on the sharpness especially on a subject’s skin. I found this set of instructions from a photographer’s forum posted by member talan.
- You can save it as an action set.
- Edit and make adjustments to you image as you wish.
- Save your PSD file if you want to keep your layers and orginal full size for re-editing later.
- Resize image to your web size if you choose to.
- Layers > Flatten image.
- Duplicate background layer.
- Make sure the copy of background layer is selected.
- Filter > Sharpen > Unsharp Mask – enter Amount 18, Radius 40, Threshold 0 – press OK.
- Filter > Sharpen > Unsharp Mask – enter Amount 150, Radius 0.3, Threshold 0 – press OK.
- Edit > Fade Unsharp Mask – enter Opacity 100% and select Darken in the Mode dropdown list – press OK
- Filter > Sharpen > Unsharp Mask – enter Amount 150, Radius 0.3, Threshold 0 – press OK.
- Edit > Fade Unsharp Mask – enter Opacity 50% and select Lighten in the Mode dropdown list – press OK.
- Layers > Flatten image.
- Save as .jpg
- Done!!!
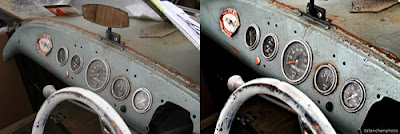
Below is a before and after. The post processed photo did have some other adjustments made other than the technique, but you will understand once you try it out yourself.
http://tech.chitgoks.com/2010/05/13/the-manny-librodo-technique
Comments